 Save
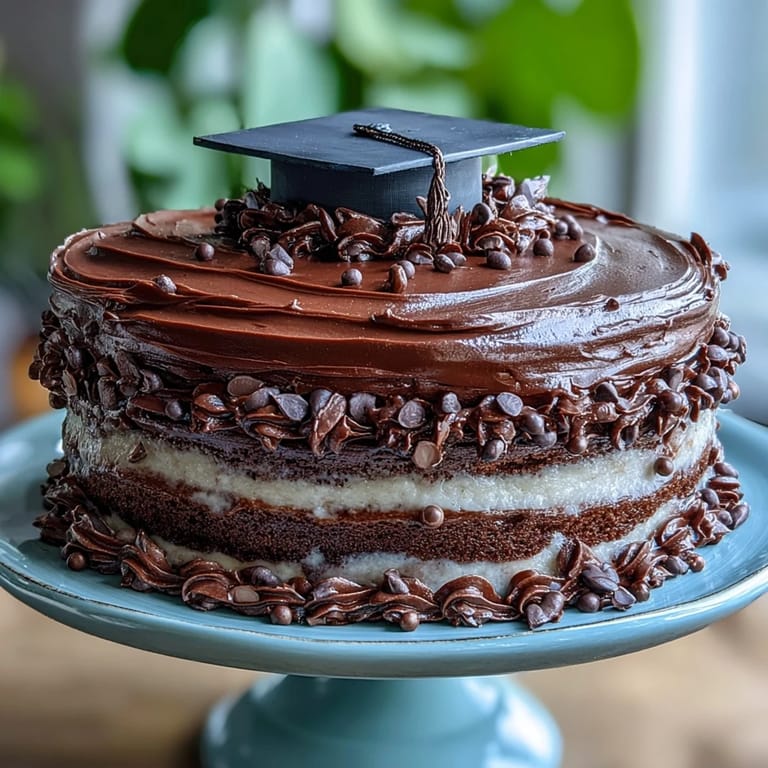
Save My cousin called me three weeks before her graduation with a request that made my stomach flutter with both excitement and panic: she wanted a cake that looked as bold and colorful as her future felt. I'd never attempted an ombre layer cake before, but something about the challenge—the precision of the color gradations, the delicate Swiss meringue buttercream, the promise of it all coming together in something show-stopping—pulled me in completely. That afternoon, I started experimenting with gel food coloring and cake batters, trying to crack the secret of smooth color transitions. By the time I pulled those four layers from the oven, I knew this would become a cake I'd make again and again, each time a little more confident than the last.
Watching my cousin's face when she saw that cake sitting on the dessert table at her party is a memory I'll carry with me forever. She literally teared up, and suddenly it wasn't just about the layers or the colors—it was about marking a moment that mattered, creating something beautiful to celebrate someone you love stepping into the next chapter. That's when I realized this cake is less about technique and more about intention.
Ingredients
- All-purpose flour (3 1/4 cups): Use the weight measurement if you have a scale—it makes the difference between a dense cake and one that's tender and cloud-like.
- Baking powder (2 1/2 tsp): This is what gives the cake its light structure; don't skip it or reduce it thinking you'll adjust later.
- Salt (1/2 tsp): A small amount heightens the vanilla flavor and balances the sweetness beautifully.
- Unsalted butter (1 cup), softened: Room temperature butter creams into the sugar more efficiently, creating air pockets that make the cake fluffy.
- Granulated sugar (2 cups): This feeds the creaming process and creates that tender crumb you're after.
- Large eggs (4), room temperature: Cold eggs won't incorporate properly; let them sit on the counter for 30 minutes before using.
- Vanilla extract (1 tbsp): Choose pure vanilla over imitation—the depth of flavor elevates the entire cake.
- Whole milk (1 1/4 cups), room temperature: Cold milk can seize the butter, so plan ahead.
- Gel food coloring: Gel is concentrated and won't water down your batter like liquid coloring would, keeping the crumb structure intact.
- Egg whites (6 large), for buttercream: Swiss meringue requires patience, but the result is a buttercream that's glossy and stable at room temperature.
- Granulated sugar (1 1/2 cups), for buttercream: The sugar dissolves into the eggs over gentle heat, creating a silky base.
- Unsalted butter (1 1/2 cups), softened and cubed: Adding cold butter to warm meringue will break the emulsion, so keep it at room temperature.
Tired of Takeout? 🥡
Get 10 meals you can make faster than delivery arrives. Seriously.
One email. No spam. Unsubscribe anytime.
Instructions
- Set up your station:
- Preheat the oven to 350°F and grease four 8-inch round pans with butter, lining the bottoms with parchment paper so your layers release cleanly. Line up your mixing bowls and have your gel coloring bottles nearby—organization here saves panic later.
- Build your dry ingredients:
- Whisk together flour, baking powder, and salt in a medium bowl, breaking up any lumps in the baking powder. This distributes the leavening evenly, so you get consistent rise in all four layers.
- Cream the butter and sugar:
- Beat softened butter and sugar together on medium-high speed for 3 to 4 minutes until the mixture looks pale, fluffy, and almost doubled in volume. This step is non-negotiable—you're literally creating the air structure of your cake.
- Add the eggs one by one:
- Drop in one egg, beat until fully incorporated, then move to the next; this takes longer but creates a smoother, more stable batter than adding them all at once. After all four eggs, mix in the vanilla extract.
- Alternate wet and dry ingredients:
- Add a third of the flour mixture, then half the milk, then another third of flour, then the remaining milk, and finish with the last of the flour, beating briefly after each addition just until combined. Overmixing at this stage develops gluten and toughens the cake.
- Divide and color:
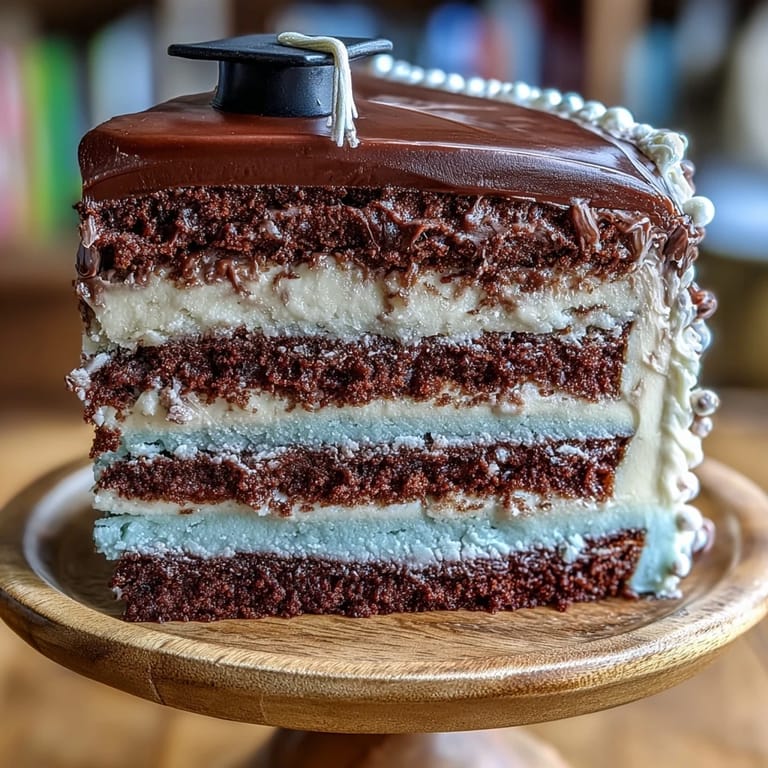
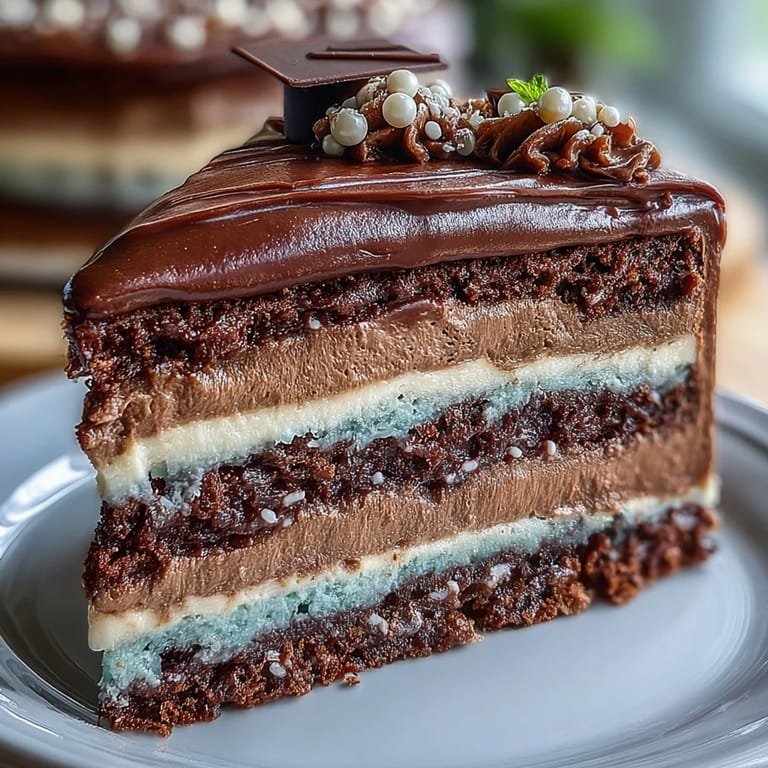
- Pour the batter evenly into four separate bowls, then add gel coloring to each one with increasing intensity—start with just a few drops in the first bowl, then gradually increase so you create a true ombre gradient from light to dark. Stir gently but thoroughly until the color is even.
- Fill and bake:
- Pour each colored batter into a prepared pan and smooth the tops with an offset spatula, then slide all four into the oven at once. Bake for 22 to 25 minutes, checking at the 22-minute mark with a toothpick—it should come out clean or with just a few moist crumbs.
- Cool with patience:
- Let the cakes rest in their pans for 10 minutes while they firm up, then run a knife around the edges and turn them out onto wire racks to cool completely. Rushing this step can cause the layers to crack or crumble.
- Make the Swiss meringue buttercream base:
- Combine egg whites and sugar in a heatproof bowl, then set it over a pot of simmering water, whisking constantly until the mixture reaches 160°F and feels smooth to the touch when you rub it between your fingers. This pasteurizes the eggs and dissolves the sugar completely.
- Whip into glossy peaks:
- Transfer the warm mixture to a stand mixer and beat on high speed for 8 to 10 minutes until it's fluffy, cool to the touch, and forms stiff peaks when you lift the beaters. Don't skip this step—the air incorporation is what makes the buttercream light and spreadable.
- Add the butter gradually:
- With the mixer running on medium speed, add butter a few cubes at a time, waiting for each addition to fully incorporate before adding more. Once all the butter is in, add vanilla extract and mix until silky and smooth.
- Color the buttercream:
- If you're tinting the frosting to match your cake layers, divide it into separate bowls and add gel coloring to create your ombre effect. Keep one portion white or very light for contrast if desired.
- Assemble the cake:
- Place the darkest cake layer on a cake stand or serving plate, spread a thin layer of buttercream on top, then stack the next layer, continuing from darkest to lightest so the ombre effect is visible from the side. This visual progression is what makes the cake so stunning.
- Apply the crumb coat:
- Spread a very thin, even layer of buttercream over the entire cake, filling gaps and sealing in crumbs, then refrigerate for 20 minutes so this base layer sets firm. This prevents crumbs from mixing into your final frosting layer.
- Final frosting and decorating:
- Apply a thicker, more generous layer of buttercream, smoothing it with an offset spatula or piping on decorative swirls and details. If you've tinted the buttercream, blend the colors slightly on the cake's exterior for an ombre effect that matches the layers, or pipe dots and designs with contrasting colors.
- Add finishing touches:
- Scatter edible pearls, place a graduation cap topper, or pipe a border of frosting rosettes—whatever feels celebratory and right for the occasion. Chill the finished cake until the frosting sets, then let it come to room temperature for 30 minutes before cutting and serving for the best flavor and texture.
 Save
Save Months after that graduation party, my cousin sent me a photo she'd taken of the cake lit up by afternoon sunlight, with people crowded around it laughing and taking their own pictures. In that moment, I understood that this cake had become more than just dessert—it was a time capsule, a tangible celebration of a threshold moment. Every celebration cake I make now carries that same intention.
The Secret to Ombre Perfection
The magic of an ombre cake isn't just visual—it's about understanding how color and batter chemistry work together. When you're dividing the batter into bowls, think about the gradient you want to see: if you're doing five shades of blue, your first bowl should be barely tinted (almost white with just a whisper of color), and each subsequent bowl should be progressively darker. I learned this the hard way by making my first ombre cake look patchy and uneven, with weird gaps in the color spectrum. Now I keep a visual reference nearby, sometimes even matching my gel coloring to paint swatches from the hardware store to ensure a smooth transition.
Why Swiss Meringue Buttercream Matters Here
American buttercream—the kind made with powdered sugar and butter—is delicious, but it's heavy, it's sweet, and it can overwhelm the delicate vanilla cake underneath. Swiss meringue buttercream is the opposite: it's silky, it's stable, and it tastes like pure butter and vanilla without the cloying sweetness. The technique requires a bit more attention (you're working over a double boiler, you're monitoring temperature), but the payoff is a frosting that holds its shape beautifully in an air-conditioned room and actually lets you taste the cake. Plus, because it's less sweet, you can add more coloring without it tasting artificial or waxy.
Scaling and Serving
This recipe makes a four-layer cake that serves 12 people generously, with each slice showcasing the beautiful ombre effect. If you're celebrating a smaller gathering, you can halve everything and make a two-layer cake in 8-inch pans, baking for about 20 minutes. For a larger celebration, double the recipe and bake in six pans if you have them, or bake in batches, keeping unused batter covered at room temperature for no more than 30 minutes. The buttercream can be made up to three days ahead and stored in an airtight container in the refrigerator; bring it to room temperature and re-whip briefly before using.
- Bring the finished cake to room temperature before serving so the buttercream tastes rich and the cake is tender rather than cold and dense.
- A serrated knife dipped in hot water and wiped clean between cuts makes slicing through the layers much cleaner and easier.
- Store leftover cake covered loosely on the counter for up to two days, or in the refrigerator for up to four days if your kitchen is warm.
 Save
Save This cake is a love letter to milestones—to the big moments that deserve to be marked with something beautiful and thoughtfully made. Whether it's a graduation, a promotion, an anniversary, or simply a celebration of someone you care about, this ombre cake says what words sometimes can't: that their moment matters, and you showed up for it.
Recipe Questions & Answers
- → How is the ombre effect achieved in the layers?
The batter is divided into four portions and tinted with increasing amounts of gel food coloring to create a graduated color transition after baking.
- → What makes Swiss meringue buttercream different?
It's made by heating egg whites and sugar before whipping, resulting in a smooth, silky texture that's less sweet and more stable than traditional buttercream.
- → Can the colors be intensified?
Yes, using gel food coloring instead of liquid produces more vivid shades in the baked layers and frosting.
- → Are there suggestions for decorative elements?
Edible gold or silver pearls and themed toppers like caps or diplomas add festive and elegant detail to the finished cake.
- → What tools are essential to make this layered cake?
You'll need four 8-inch round cake pans, a mixer, bowls, an offset spatula, piping bags, and wire racks for cooling.